How wells are constructed.
How wells are constructed is one of the more common questions I receive. The various types of wells common to SC are:
a. Type I – open hole in bedrock aquifers;
b. Type II – screened with natural filter in unconsolidated aquifers;
c. Type III – screened with artificial filter in unconsolidated aquifers;
d. Type IV – open hole in consolidated limestone aquifers;
e. Type V – bored or dug well having a large diameter.
In the Lowcountry of SC, type III and type IV are the most common.
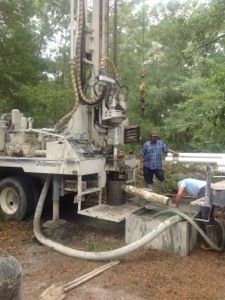
A shallow well type III is constructed using a small drill rig that is powerful enough to penetrate medium rock formations without too much trouble. Hydraulic powered rigs are most commonly in use. A 4-10″hole is drilled using the mud rotary drilling method. This method allows the use of specialized muds which prevent cave-ins of sands or swelling of clays. This is important if drilling in differing geology since no hole is typically the same. It used to be said that well drilling was more an art than a science. This is probably no longer true as mud technology rules and those who do not embrace these techniques will soon fail or become irrelevant. The proper mud mix will also speed up development and sealing the borehole annular space (also known as grouting).
Once the hole is drilled, we then install the centralizer, screen and casing. The screen is normally attached to the bottom of the casing. Once this is installed, a gravel pack will be installed around the screen. The gravel pack may be installed by gravity or by Venturi tremie line. If gravity is used then a thorough check must be done to verify the gravel was actually placed properly. After the gravel is placed, we may then proceed to the development phase. We normally use the surge block development method or a quicker version known as hydro-surge. Information about these methods are very difficult to find due to the fact that most well drillers aren’t into writing things down. I personally use the Johnson Screen, “Groundwater and Wells” version II.
After the well is developed and a soil samples report is recorded, we may grout the well. We use Bentonite clay (sort of like cat litter) which is mixed using a swell delay polymer. This allows us to pressure grout to the top of our sealed gravel pack. Once well is grouted it is considered complete. At this time we always sterilize the well using 13% bleach or an non-chlorine alternative.
We may now install a pump system.
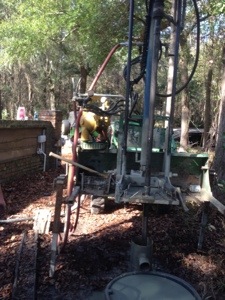
To construct a type IV well is similar except normally the drill rig is much larger. In the Lowcountry the shallowest documented aquifers are the Santee Limestone and the Upper Floridian, and they require the use of a rig weighing in excess of 20,000 lbs and a pump capable of 300+ psi. I have heard tales of novices doing it with less, but again, to be practical you must have a decent drill rig.
Once a 6-10 inch hole is drilled down to the first confining layer (marl, which has properties similar to clay, but more like a soft limestone) a casing is installed and sealed into the confining layer. Bentonite is nowadays used to properly seal the bottom of the casing, although there is no specific regulation requiring a positive seal. Old timers still use the natural sealing properties of the clay like marls to seal. Bentonite does the job every time without fail, and so for this reference that is what we recommend.
Once bottom of casing is sealed, you drill through the casing, back into the confining layer and into the aquifer. Aquifer penetrations vary, but in the Santee Limestone, 100 ft of penetration is more than sufficient. In a few places the limestone layer is thinner and produces less water. Experience is needed with these type wells since the aquifer may change rapidly from one site to another. Once total depth (TD) is reached, the drill rods are pulled back some and an air compressor is turned on and this begins the testing and development phase. Most drillers pull back their rods after verifying flow, moving off the equipment except for a small tag along air compressor which will continue to develop the well after the driller leaves. A fuel man may come out periodically to refuel the compressor and check water clarity. A lot of water may have to be pumped before well may be completely clean. Sometimes truck-loads of sand comes out. It can be amazing at times.
Once we have cased, drilled, developed and tested our new well, we will grout the annular space between the casing and the ground. Sometimes this is done twice due to settling. When you consider these casings may extend a couple hundred feet into the ground, settling is quite common. We then complete all drilling logs and reports, and are free to begin pump installation.
Drilling Deep wells can be challenging beyond just the sheer equipment needed, but once some experience is gathered, it becomes second nature. Most drillers know every squeak and vibration of their rig and will sometimes overlook small mechanical failures to “limp” through a well, because once a well has been started it is difficult to stop. My father once had a transmission seize in a lower speed gear while drilling down the last 40 ft of a 450 ft well. It took us all day to drill 40 ft (normally took less than an hour), and then tripped out the hole in a whopping 3 hours! (Usually takes about 30 min or less). We then drove the rig over 100 miles home at 17 mph. My Dad recalled seeing lots of middle finger waves.
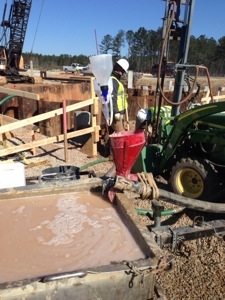
THIS IS A PIC OF A MUD MIXER BEING UTILIZED IN A MUD PIT